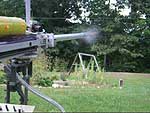
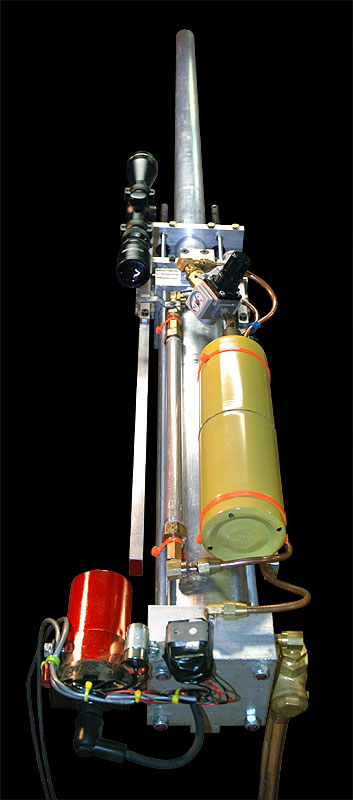
The supersonic breech loading all aluminum spud gun
| ||||||||||||||||||||||||||||||||
|
|
|||||||||||||||||||||||||||||||
Recent DevelopmentsSince this page was written, many things have changed on the gun.
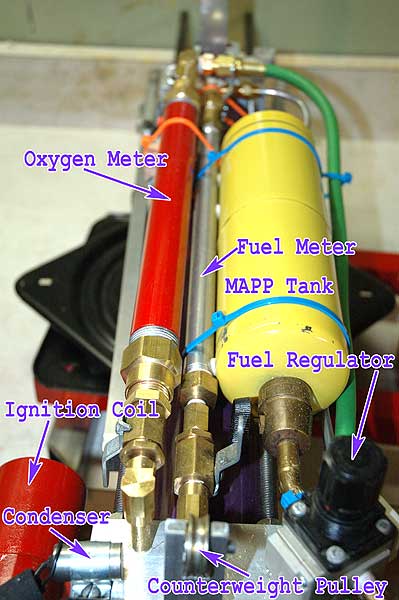
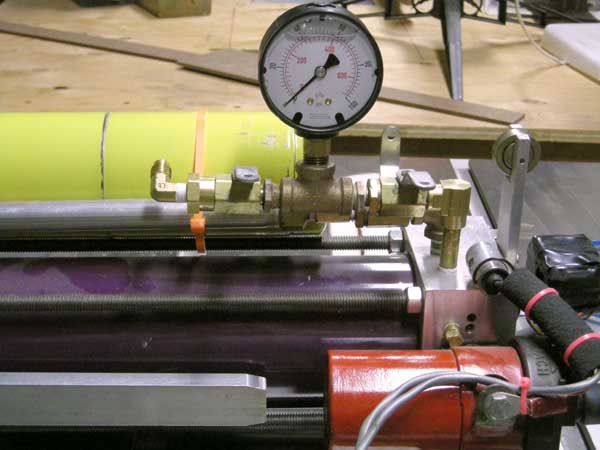
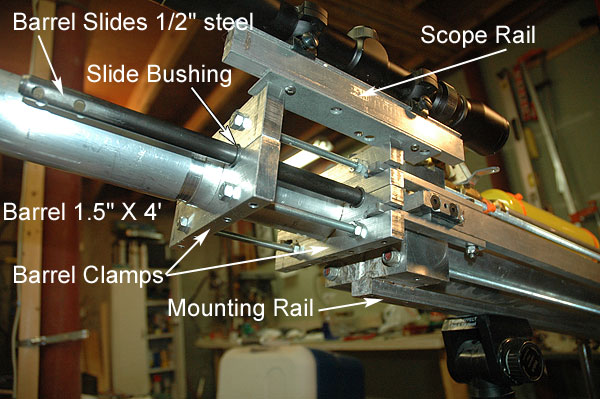
But . . . Why?I started building PVC spud guns about 15 years ago after seeing an example a friend made. Like most people who see one for the first time, I couldn't stop rolling on the ground laughing!After using PVC for a while, I thought it would be cool to build a small-caliber, all copper, self-contained gun with breech loading and a basket on top like a paintball gun. You'd work the bolt and a fresh spud would drop in. The lever action would simultaneously operate the air and fuel valves. As I started to draw this, it became clear that this was a lot of work for something that was relatively small-potatoes. Meanwhile, a draftsman friend was working on a military "Gas Gun." This was a gigantic ship-mounted Howitzer that could lob shells 7 miles away. The Gas Gun could reload so fast, that with high trajectory, you could launch several shells in quick succession which would all arrive at the target (+/- a few yards) simultaneously. This was the inspiration for the fully self-contained, rapid loading nature of the Taternator II. So I scaled everything up to something similar to traditional PVC gun size, plus a bit extra to push it firmly into the realm of OMG WTF??? and built this all aluminum spud gun. By far, the most complicated part is the breech loading - it had to be fast, easy to use, and very strong to support the full weight of the extended barrel. The rest of the gun is much stronger than usual to allow chamber pressures up to 300 PSI that would shrapnel PVC on the first shot. I'm sorry that I can't post mechanical drawings. I have piles of them, but the design changed constantly during construction, so the drawings are no longer accurate - merely inspiration. What It's LikeThis thing packs a serious punch. It's much louder than a normal hairspray spud gun, more like a handgun. Not like "foom!" More like "POW!" echoing through the hills like a gunshot. Not quite loud enough to want ear protection unless you are down-range of the muzzle blast. Without a spud, makes a handy noisemaker with fast firing rate. Recoil is enough to knock itself off a normal tripod, so I built a seriously heavy duty gun mount with pan and tilt. It will puncture fresh 3/4" plywood at 50' (with a potato). It is extremely easy to use. Reload and shoot in about 15 seconds, 10 seconds with two operators. Never misfires unless your get the fuel mixture wrong. The scope is mostly for show, but makes it very easy to hit the target every time. After about 100', the accuracy falls off hard as the air has time to move the slug in random directions. A 1' blue-white flame is visible in dim light. After sustained firing, chamber and barrel get warm but not hot. MAPP tank lasts for thousands of shots. Battery rarely needs charging. Can clip onto car battery if you're in a pinch.People's reactions are similar to the plastic spud gun: Some can't stay away, some can't stay far enough away. A few more people are afraid to come near this gun, but get over it pretty quick when they see a 10 year-old use it. Although a spud gun is clearly a "guy thing," I find that gals want to try it first, and tend to hit the bullseye more often. There is general consensus that it should be kept hidden in public and would probably get me arrested for transporting a WMD (Weapon of Mashed Destruction[1]). It's very easy to teach people how to use this gun, as it's just blower-spud-charge-fire. No ramrod, no counting the seconds of fuel, no misfiring. Instead of the challenge being, "Just hit the target," it's more like, "Hit the center of the target." The gun rarely needs cleaning, as it blast-cleans itself every shot. The MAPP gas does not leave behind water vapor like propane does. The only residue is tiny flakes of spud from the cutting action. The flakes tend to blast out as yellow sparks. The outside gets pretty sloppy, as the leftover ring of cut spud gets pulverized when the breech closes. If needed, the gun can be broken down in a few minutes with simple tools. Theory of OperationConstructionI used aircraft grade aluminum in all high-pressure and high leverage areas. Most plumbing is 1/4" flare fittings. All parts are machined from raw stock. A friend let me use his small machine shop. Another friend turned the large barrel and chamber on a huge CNC lathe which I was not allowed to operate ;) which is a good thing, since the gouge in the barrel, 1.000 +-.0001 inches from the front clamp is because of my own faulty measuring.The combustion chamber is held in place between the front and rear manifolds by four 3/8-16 high-tensile steel rods. The 4x4x2" manifold blocks are drilled through at the corners. Lock nuts are kept fairly tight, pretensioning the rods. There is no glue or gasket compound anywhere. Seals are ensured by precise machining. The rear manifold is pretty simple: 3 fresh air holes are drilled from the chamber into a larger supply bore, and the fresh air check valve threads into a side hole tapping into that large fresh air bore. Fuel enters at the top, drilled down to the exact center of the block. Inside the chamber, a 1/4" flare nipple threads into the exact center of the block, meeting the fuel supply bore. A 1/4" aluminum pipe 22" long fits onto that nipple and brings fuel into the chamber through many tiny holes distributed along its length. The ignition wire slips trough the back of the manifold right next to the fuel nipple and runs the whole 22" length of the fuel pipe. The ignition wire is broken in several places by 1/8" gaps, causing a chain of sparks all the way up to the far end of the fuel pipe where the final spark hits the grounded pipe. The fuel pipe is jacketed in thick silicone tubing where the ignition wire breaks occur, which prevents arcing to the fuel pipe prematurely. Ignition wire is zip-tied and siliconed to the fuel pipe to be blast resistant. The front manifold is very complex and drilled like swiss cheese. The exact center is bored out to the ID of the barrel. The frontmost inch of the manifold is bored to the exact OD of the barrel, so the barrel fits in perfectly, cutting the spud. At the top of the front manifold is the low-flow valve, which allows pressure relief when fuel is flowing, but snaps shut buy the extreme combustion pressure. A 1" circle of 1/4" holes is drilled straight down 1/2", meeting an oval slot which goes backward into the combustion chamber. The block above the manifold has a single 1/2" hole. A 1" dia by 1/4" thick brass disk makes the seal during combustion, slamming up against the small block. The vertical groove in the face of the front manifold was intended to be a seating point for vertical cutters on the barrel clamp, but turned out to be unnecessary. The barrel clamps are each two pieces, bored to slightly less than the barrel OD. The barrel has shallow slots cut into it to accept the clamps. The two clamps are rigidly locked together by four 1/4-28 high-tensile steel rods. The whole assembly is a rigid box, allowing the barrel to slide and keeping the breech aligned with the center of the front manifold. Each clamp has four hardened 1/4-28 4" bolts which lock the clamp on the slots in the barrel without crushing the barrel. The outermost rear bolts are shoulder bolts with unthreaded sections where the actuator levers can hinge, serving a dual role. The four actuator levers fit into slots at the ends of the rear clamp. The scope rail is rigidly secured to the barrel clamps. Mounting the scope to the the barrel is crucial, as the barrel has a small amount of play when in the closed position, so a chamber mounted scope would never be accurate. A flat plate moves the scope rail far enough away from the gun so you can fit your face there. The 1/2" steel rods that the barrel clamps slide on are drilled into the face of the front manifold, then secured from the side by the same long bolts that secure the clamp hinge. The slides are strong enough to support the dangling weight of the barrel without bending, so the barrel slides smoothly front and back. High-tech plastic bushings prevent contact between the clamps and slide rods. The large actuator handles generate tremendous force when closing the breech, similar to bolt cutters. The handles are slotted onto hinges bolted to the sides of the front manifold. The four actuator levers hinge on the handles with 1/4" shoulder bolts. Improvements since this page was posted1Thank you to www.spudgun.com for the WMD pun. 2,3Special thanks to www.burntlatke.com for the metering pipe and multiple-spark concepts. Their "Fuel Tool" is a useful calculator for determining chamber vs barrel ratio and fuel to air ratio. 4Thank you to Chris Saiko and Jacob Larson for their inspiring cinderblock destroying 20' Spud Cannon. I would like to acknowledge www.spudtech.com who has also created an all-aluminum breech loading spud gun. Frank Kennedy, fkennedy at taconic dot net
|
||||||||||||||||||||||||||||||||